
Livehelper
User Manual
Version 3.0
LIVEHELPER.COM LLC
Hughes
Center II
3753 Howard Hughes Parkway #200
Las Vegas, NV 89109
Main: (702) 836-8457
Fax: (702) 892-3950
ã 2001-2002, Livehelper.com LLC
Table of Contents
2 Signup and Installation of Livehelper
3.1.2 Real Time Traffic Monitoring
3.1.3 Web Based Administration
3.1.4 Status Display on Button
3.1.7 Customizable Event Sounds
3.1.8 Operator-to-Operator Text Chat
3.2.1 Image in Chat (Preset HTML)
3.2.2 Customizable Chat Window
3.3.4 Operator-to-Operator voice chat
3.3.6 Simultaneously use Remote Controls, Voice and Text Chat
4.2 Admin Roles and Responsibilities
4.3 How to create an Account in the Admin Area..
4.3.3.1 Creating Preset Message Group
4.3.3.2 Adding Preset Message to a Message Group
4.3.5 Customized Default Messages
4.3.6.1 Credit Card Information
5.2.1 Click on Add button to add preset messages
6.2 Operator Availability Schemes
6.3.2.8 Change Default Message
6.3.2.11 Show only Online operators
6.3.2.12 Show Offline Messages
6.3.2.13 Display Internet Down Message
6.3.3.2 Send and Receive mails
6.3.3.4 Enable Email signature
6.3.3.5 Show Email Alert window
8.1 Step 1 – Starting Voice Chat
8.2 Step 2 – Connection for Voice Chat
8.3 Step 3 - Communication Interface
Livehelper is a customer assistance tool for your website that enables site visitors to instantaneously communicate with your customer service personnel using Text Chat or Voice Over IP.
Visitors to your website, simply click on the Livehelper button and are connected to one of your customer service personnel. Your company representative then provides immediate answers to customer queries by providing information, pushing web pages, sending graphics or even guiding them through your website.
Thereby, Livehelper provides you with a very superior customer assistance tool that allows you to provide comprehensive online customer service and support. Your Company, in turn, realizes greater efficiency, by increasing revenue and reducing support cost by easily integrating this tool with your existing technology.
The Livehelper tool is provided on an Application Service Provider (ASP) basis. This means there is no hardware to install and you can get started instantly. The setup required minimal technical ability and the service will be up and running on an average of 30 minutes.
Livehelper 3.0 is available in three packages
- Basic Package
- Professional Package
- Corporate Package
The Basic Package allows you to provide immediate answers to customers by using our basic chat features. Essential features such as the “Browse List” which allows you to track every visitor on your website is available in this package. We also have features such as “Info” which enable you to save information about your clients, “Email Signature”, “Advanced Call Routing”, “Web based Administration” and much more features comes with this package.
This Package is suited for personal or small websites.
The Professional package comes with all the features in the Basic Package in addition to various other advanced features. For example we have “Logs” which stores all the chats between your operators and customers and thereby allowing you to review them. You can guide your customer to the page he is looking for by simply opening up a browser window on the client side using the “Push” feature. Some of the other features available in this package are “Skins”, “Stats”, “Preset Text Messages” etc.
The Professional Package is suited for a small or medium size business that requires advanced chat and monitoring capabilities.
This is the most comprehensive package that is provided by Livehelper. It includes all the features that are available in the Basic as well as the Professional Package. There are advanced features such as “Pull” which will enable you to proactively invite any website visitor for a chat and offer them assistance. The “Remote Feature” allows your operator to virtually access your customer's computer and is especially useful to help him solve his technical queries. This package also provides the features of “Voice Chat” and “Transfer”.
The Corporate Package is ideal for customers who need to provide advanced customer service to their customers.
To user Livehelper, your computer must have one of the following Windows Operating System.
· Windows 9x
· Windows ME
· Windows NT 4.0
· Windows 2000
· Windows XP
Your computer must also need the following minimum requirements.
· Internet Explorer 4.0, Netscape 4.0 or above
· Soundcard (for Voice enabled services)
· 28.8 Kbps Internet bandwidth
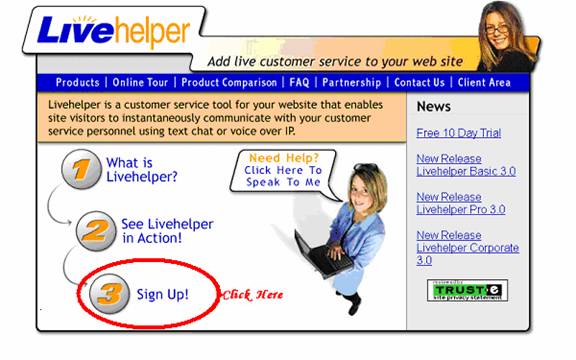
Get Started Immediately! You can Download Livehelper by clicking on the “Sign Up!” link on the Home Page. All you have to do it to fill up the sign up form and submit and you are ready to download right away.
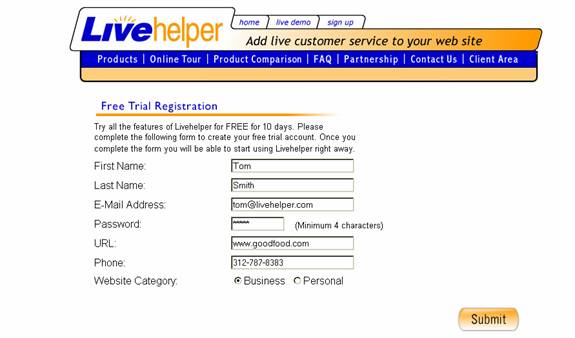
2.2.1 Signup Form
The second step of course is to fill the form below and submit. Be sure an appropriate Email Address is entered, as all communication will be done through this E Mail ID.
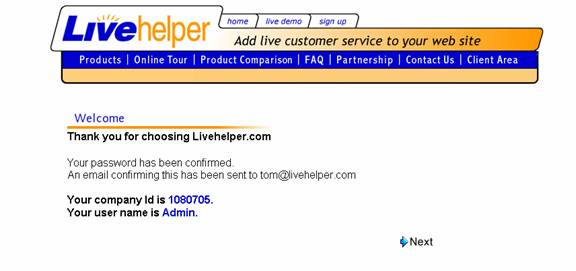
2.2.2 Account Confirmation
Once you have clicked on Submit, you will receive a confirmation of your account being created, and get your Company ID as well as your User Name which you can use to login into your account after clicking on Next link.
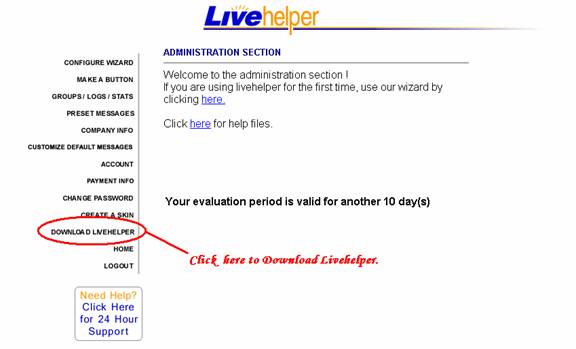
After having receiving the confirmation of your Livehelper account, you will have login to the admin area. You have to then click on the “Download Livehelper” link to download the Latest version of Livehelper.
The next option you get is to either save or open the Livehelper.exe
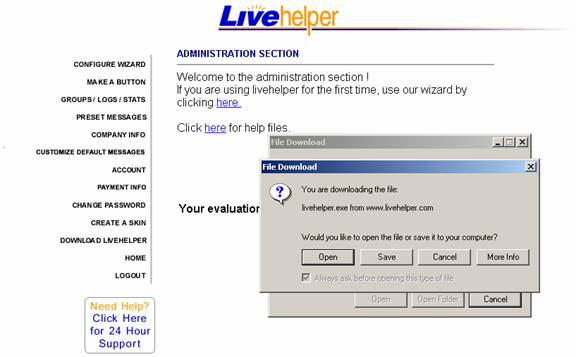
If you have chosen the option “save” then the next step is to save the Livehelper.exe.

This, then commences the Downloading process of the .exe file

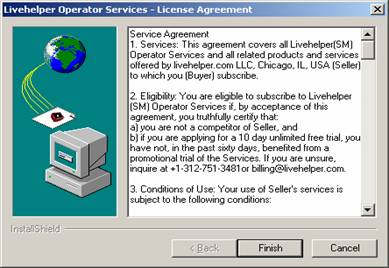
After the LiveHelper.exe file has been downloaded, Click on it to start the Setup wizard. The following GUIs will guide you through it.
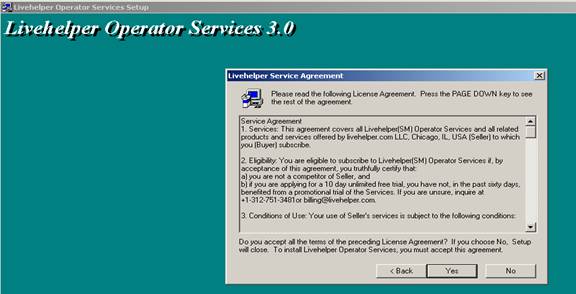
You will first get the Livehelper License Agreement. This agreement gives details such as Service Agreement for subscription, the Eligibility Criteria, the Conditions of Use, Warranties, Term of Agreement etc. Click on Finish in order to continue.
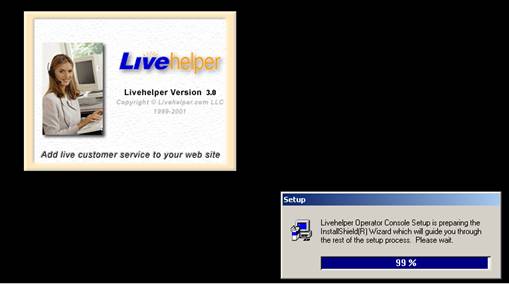
Then the Livehelper Operator Console Setup prepares the installation of the Wizard which act as a basic guide through the rest of the Setup Process.
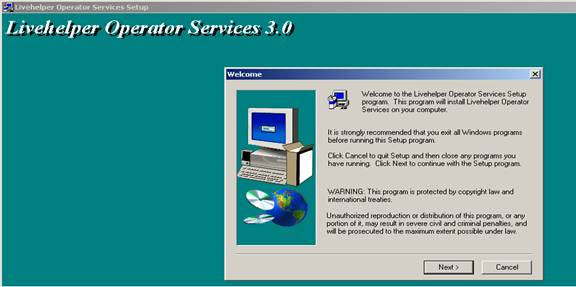
Step 1 – Setup Wizard - Recommendations
This is the first step in the Livehelper Operator Services Setup program. This program installs the Livehelper Operator Services on to your system and also gives basic recommendations to be followed.
Step 2 – Setup Wizard – License Agreement
In the next step you will have to accept the License Agreement in order to continue with the installation of the program
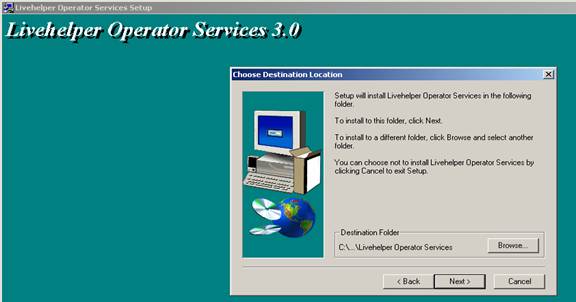
Step 3 – Setup Wizard – Installable Location
After accepting the agreement Livehelper will be installed on to the specified folder. To install into a different folder you can click on “Browse” and then choose the desired Destination folder.
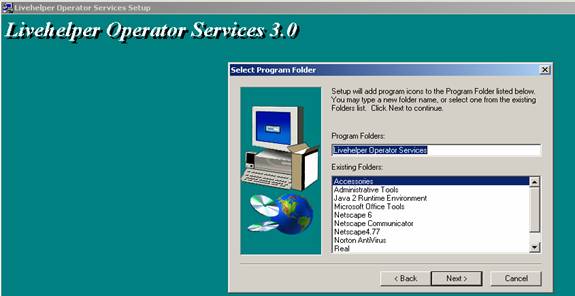
Step 4 – Setup Wizard – Program Folder Selection
Here the Setup Wizard adds the Program Icon to the Program Folder. You also have the option to select a new folder name or choosing one from the existing folder names.
Step 5 – Setup Wizard – Installation Process
Here the Livehelper Operator Services is installed to the specified folder.

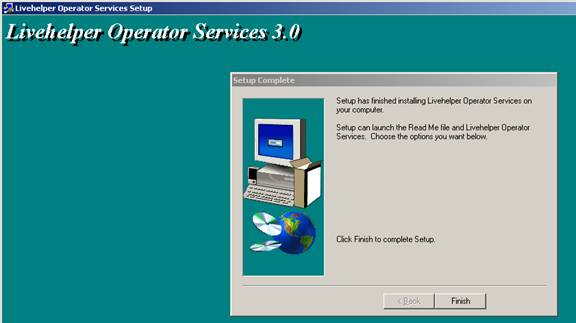
Step – 6 – End of Setup Wizard
The last step shows that the installation of the Livehelper Operator Services has been undertaken and clicking on “Finish” will complete the Setup.
The BASIC PACKAGE includes the following features:
3.1.1 Text Chat
In the Basic Package, the users have access to unlimited text chat. Web site visitors simply click a Live Help Button on your website to instantly join a Text chat with your staff or can Email messages when they are offline.
In Text chat you also have the option of using features like:
3.1.1.1 Smileys
Smileys are an effective method of expressing thoughts in a text chat. We have now included this feature in the product. You have the option of choosing from eight different Smileys.
3.1.1.2 Font
You are also provided with the option of using various Fonts, Font Style and Font Colors and Sizes in your Text chat.
3.1.2 Real Time Traffic Monitoring
Your operators have the ability to view visitors on your site, track pages they navigate, and also view the total time spent by them on the site. Operators have the opportunity to approach the clients based on their needs, can view comprehensive details about the customer, store information about them and more.
3.1.3 Web Based Administration
Web Based Administration allows the administrator or any Operator with admin rights to log into the Client Area of our website. The Administrator has full rights to view the Log and Statistics of Operators, Create, Delete and Modify a Supervisor/Operator.
The Administrator cannot login as an Operator.
3.1.4 Status Display on Button
The Status Display on Button allows you to have separate images for offline and online operators. This makes it convenient for your site visitors who want to communicate with your customer service personnel.
3.1.5 E-Mail Signature
This feature is one, which you could use to append a Button of Livehelper at the end of your Email, so that at the receiving end, the person is given an option of contacting you live for a chat.
The Button skin can also be customized.
Limitation:
The current version does not append Email Signature for any Replies you send for the mail you receive; you have to append it manually.
3.1.6 Customizable Button
Livehelper enables you to create custom buttons that match your web site.
You have the option of selecting your Button format.
- Default button with Tracker
- Invisible Tracker
- Customized Button with Tracker
- Customized Button without Tracker
A generated HTML script for your Button is generated, which can be Copied and Pasted into the source code of your Website.
3.1.7 Customizable Event Sounds
This alerts the Operator by different sounds in case of any Event such as a new visitor on the web site, Operator logging in, and Receiving Calls etc.
3.1.8 Operator-to-Operator Text Chat
Operators can chat with any operator logged in under your company, even if the operator is logged in from another office or a remote location. This is a helpful feature in sharing operators workload or knowledge to serve your customer and answer his queries.
3.1.9 Info
The Operator can store Information on the Clients they have chatted with. They can use this as a reference when the same client returns for another chat and can view the information even while the chat is in progress. If any information has been stored about a particular client, an Info icon appears on the Browse List that can be viewed by any operator logged in.
3.1.10 Advanced Call Routing
Advanced Call Routing is a feature, which allows the calls to be routed intelligently according to the Group, Status and the volume of Calls. This allows you to create different groups like Support, Marketing etc. so that the calls from your customers will be routed directly to the group it is meant for.
3.1.11 Advanced Queue
This feature is useful for the operator to view the customers in the waiting list, their total waiting time, the Group from which they need assistance, the type of chat they have opted for, their IP address and thus gives the operator a criterion upon which he could pull the customer to chat.
3.1.12 Support Schedule
Outside your company’s normal business hours, customers are notified of the next time that your online personnel will be available. Customers also have the option to leave an electronic message, automatically sent to your e-mail address.
Limitation:
Multiple Schedules (Operator able to schedule his availability within a day i.e. Hourly scheduling) not supported in the current version.
3.1.13 POP 3 Mails
This is a feature, which allows the Operators to manage their Emails from the Operator Console itself. It provides the operators with Information of new mails in their Inbox. The Operator could set the time in minutes for checking his POP mail server for new mails. They will be notified as and when new mails come in. The Operator can also send and receive mails using this feature.
The features of PROFESSIONAL PACKAGE are:
3.2.1 Image in Chat (Preset HTML)
Preset HTML allows you to save pieces of HTML for use in Text chats. This feature is great for displaying tables and images for things like special offers and sales. This enhances the text chat.
Limitation:
The Operator can send images to the customer, but sending images from Operator to Operator, Customer to Operator is not yet adopted in the current version.
3.2.2 Customizable Chat Window
Livehelper allows you to fully customize your chat window’s skin; you can add your own logo and Background. The Images should be as per the specified dimensions for best results. The dimensions for the 2 window sizes available to you are:
|
|
Small Window |
Big Window |
|
Background Image |
295 X 300 |
450 X 350 |
|
Logo |
295 X 55 |
450 X 55 |
3.2.3 Unlimited Logs
Livehelper stores all communications between your operators and your customers so you can go back and review the chat sessions. This feature allows you to constantly monitor the quality of your customer interaction, and can provide you with valuable insight about your visitors. The Admin can simply login into our website anytime and review the transcripts.
3.2.4 Operator Statistics
The Administrator can view advanced statistical information about both your customers and operators. He can view the statistics regarding the Call Type, Total calls, Total Time and Average time taken by the operator within the date range specified by the Administrator.
3.2.5 Preset Messages
This feature enhances the performance of the operator by setting as Presets the messages that is often sent to the Customers, rather than having to type them all over again. Preset messages can be set globally in the Admin area as well as locally by the Operator in the Operator Console. Preset messages ensure consistency by storing common responses for fast access.
3.2.6 Push Pages
This feature is useful for helping the customer in viewing the right content in the context of what he is looking for and guide him through the web pages. This service is applicable from the operator side who is in the best position to decide which page in the web site the customer should view to get answers for his Queries and can accordingly push the relevant page for the customer to view.
The CORPORATE PACKAGE includes the following features:
3.3.1 Proactively Pull Users
You operator has the ability to proactively contact and offer assistance when he spots the user in the Browse List who looks like in need of assistance.
Note:
There is no limit as far as Livehelper Software is concerned, the Operator can pull as many Customers as required, but experience shows that a single operator can handle up to four customers calls for chatting simultaneously.
3.3.2 Voice Chat
Livehelper allows you to communicate using both Text chat and Voice chat. If they like they can disable one and force users to use the other but we find that most companies like the ability for their users to select their most comfortable means of communication.
If you would like to provide your customers with the option of live Voice chat, you can talk to your customers through live real time online Voice Chat with our Voice over IP solution.
3.3.3 Transfer Chat
Operators can transfer a customer’s chat to any other operator that is logged in under the same company ID. This feature of transfer is available both under Text as well as Voice Chat.
3.3.4 Operator-to-Operator voice chat
This is another new feature added to the Livehelper product, its purpose is similar to that of Op-Op text chat except that in this case it is voice chat facility that could be used by the user.
3.3.5 Remote
The Remote Feature allows you to virtually access your Client’s computer right from your desktop. Through the Remote Control feature the operator can help the client fix technical issues and also demonstrate software.
3.3.6 Simultaneously use Remote Controls, Voice and Text Chat
This is a combined feature of the Livehelper, which works only for Static IP’s. Using Remote feature means the Operator will be able to get the Customer’s Desktop on his machine and able to access his machine for Guidance.
4 Customizing Livehelper
After Downloading and the Operator console software and Installing it you have to take care to make Livehelper server aware of your company and the groups and operators in your company.
The Admin has a very important role in setting up his company domain information in the Livehelper server. Follow the simple steps to setup your company domain information into the Livehelper server and reap the benefits with an optimized performance ratio.
The Admin cannot Login into the Operator Console with Username as “Admin” and Admin’s password.
Note 2:
The Operator is not allowed to use the “Admin” password to login to the “Operator Console”.
4.3.1 Groups / Users
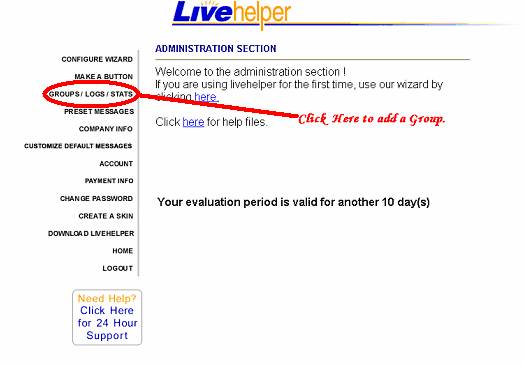
Once you have logged into the Client Area, you can manage your Account. You can create Groups by Clicking on Groups/ Logs/ Stats.
Note:
You can create a User or an Operator using the “Configure Wizard” option, which prompts directly for entering the Operator Details. The Operator created through this option is put under the Default Support Group. If you want to create an Operator under a user defined Group then Group/Logs/Stats link is your only option.
Here you can view the different user Groups you have created in your Company. If you would like to create a new group, click on the link Add Group.
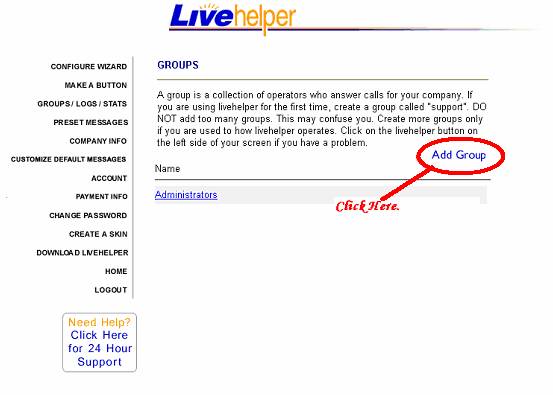
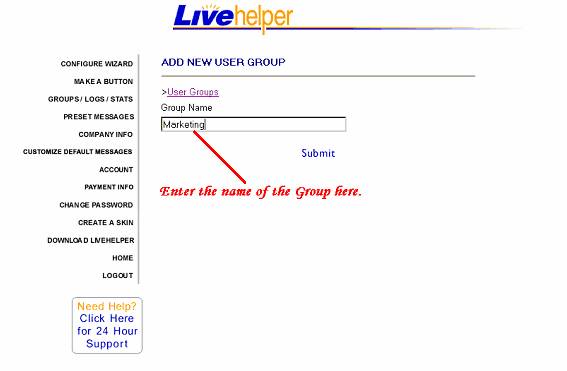
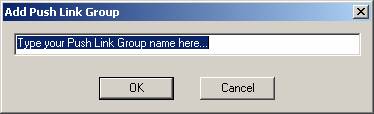
4.3.1.1 Add Group
You find the dialog box, where you have to fill up the Group Name, and Click on the Submit button.
4.3.1.2 Administrating Groups
You can view all the Groups created under your Company Account. You can click on the Group name to add users under that Group. Click on Set Time Schedule to set the time at which the particular Group will be available.
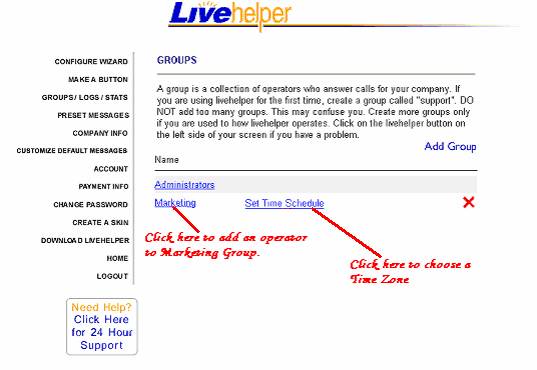
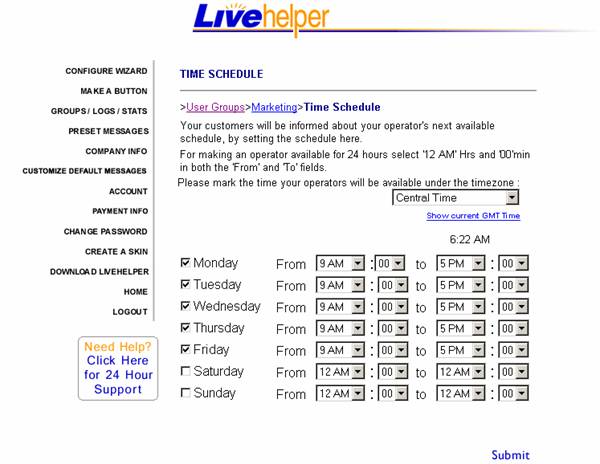
4.3.1.3 Time Zone
You can set the Time Schedule for each Group by first choosing the Time zone under which you want to operate. You can then fix the daily timings when your operators will be available, so that your customers will be informed about the next available time that they can contact your operators for a Chat.
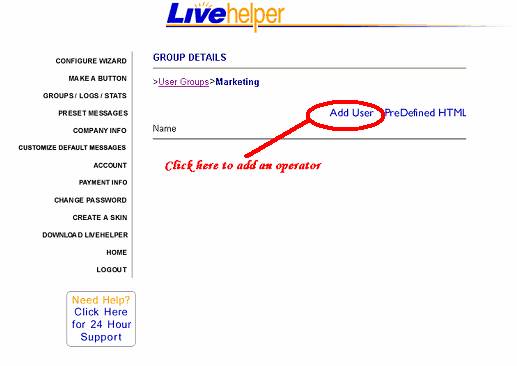
4.3.1.4 Add Users
To add users under the Groups created, click on the Add User link. Here you can fill in the details of each Operator in that group.
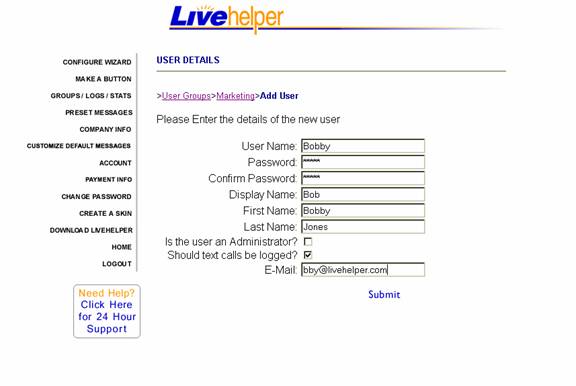
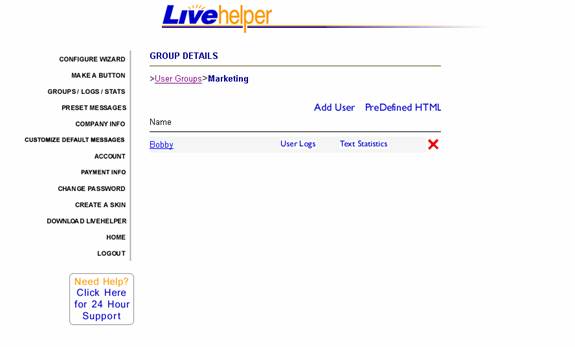
This is the form where you can create new users under each Group. You need to fill in the details of each operator like his Name, Password etc. You, as an Administrator, can also grant him Admin rights by checking on the ‘Is the user an Administrator’ checkbox. You can also choose to log the calls of the Operator by checking on the ‘Should the text calls be logged’ checkbox. Fill in the Details of the Operator in charge of Marketing and click “Submit”. Now “Bobby” is the Operator authorized to use the Operator Console.
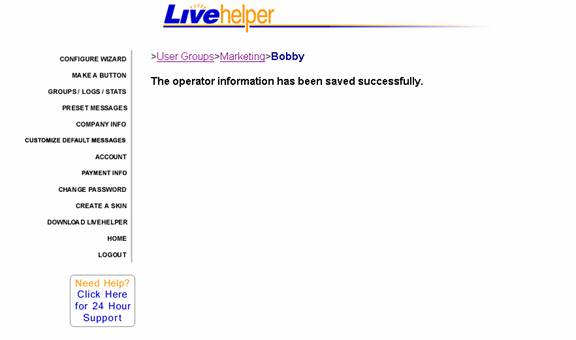
After you have filled in the details of the Operator, you have to click on Submit. You get a confirmation message saying that the information has been successfully saved.
4.3.1.5 Delete User
Once you have filled in the Details of the Operators you can click on the particular Group name, for E.g. Marketing, and you get a list of all the Operators under that group. You can also delete any user from the Group by clicking on the “Red Cross” (X) mark next to the Operators name.
Now you can see that Operator “Bobby” is listed as an Operator under the Group name Marketing.
Note 1:
For creating further Operators in the same “Group” follow Steps 9 –12.
4.3.2 Make a Button
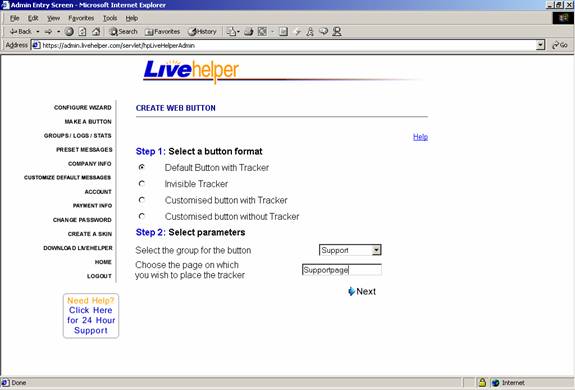
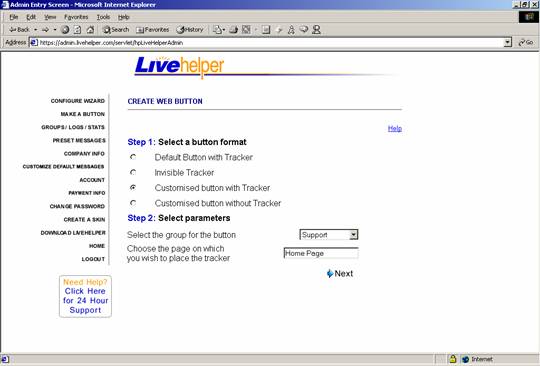
The next option available to you is “Make a Button”, where you can create a Button, which you would like to install on your Website. You have the option of creating 4 types of Buttons. They are the Default Button with Tracker, Invisible Tracker, Customized Button with Tracker and Customized button without Tracker.
In Step 1, you have to select the type of Button that you would like to have on your web page.
A. Default Button with Tracker
In Step 2, you have to select the Group name, to which you want the calls to be directed to as well as the Page on which you want to place the Tracker code which will help you track the visitors on your Web site.
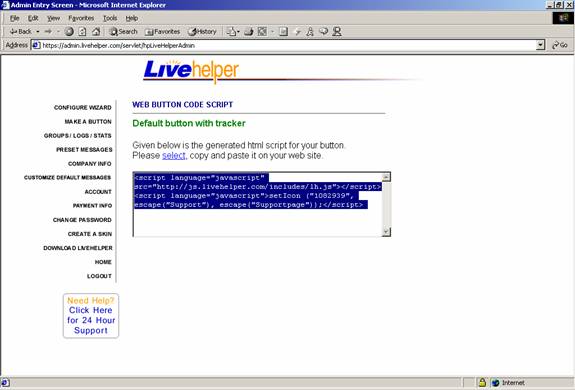
Once you have clicked on Next, you receive the Button script for the Default Button with Tracker. You need to Select all and simply copy and paste the code onto the source code of your Website.
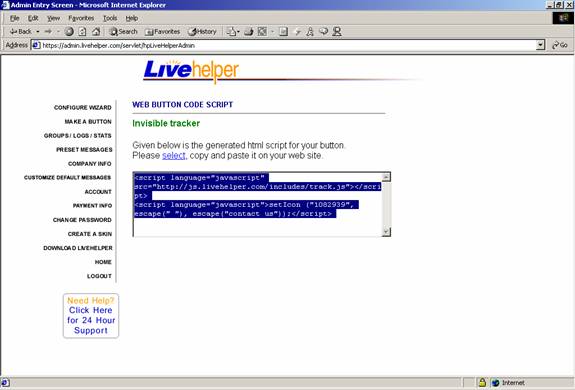
If you opt for the Invisible Tracker, you need to only choose the page on which you wish to place the Tracker code. You then have to click on the Next link.
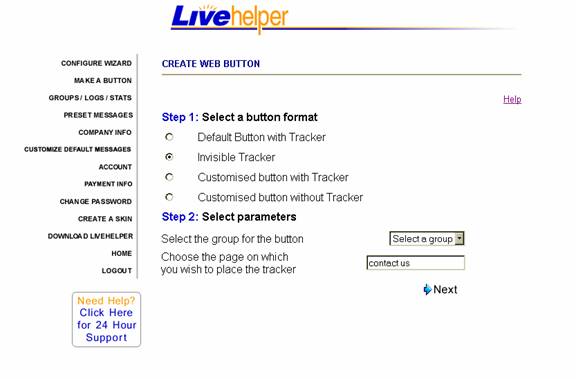
Once you have clicked on Next, you receive the Button script for the Invisible Tracker. You need to Select all and simply copy and paste the code onto the source code of your Website.
C. Customized Button
Step A:
You can customize your button by adding your own images or Text that you would like to have as the Button link on your Website. You can opt either for the Customized Button with Tracker or the Customized Button without Tracker. After you have clicked that option, you need to select the Group name where you want the calls to be directed and the page ID on which you want to place the Tracker code.
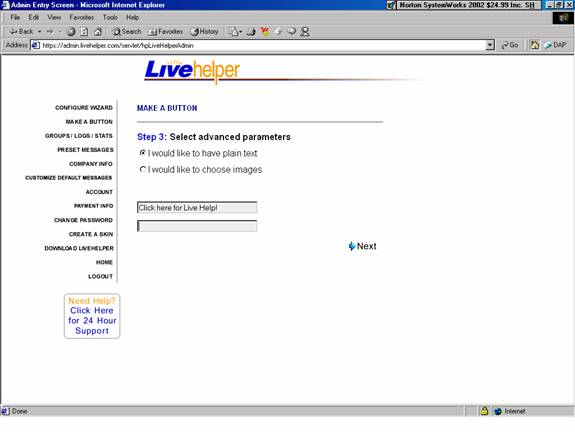
Once you have clicked on Next, you will have to choose whether you want Plain Text or Images, as you’re Button.
If you have chosen to have Plain Text as your Button link on your web page, you need to choose that option and then fill in the Text in the Form below.
After you have done it, click on Next link.
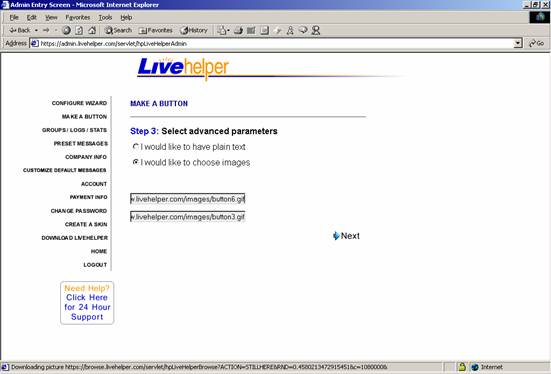
If you would like to have Images as your Button link, you need to provide two Image URLs in the form below. One for the Online Image (for when your operators are online and available for chat) and one for the Offline Image (for when your operators are unavailable). Click on the Next link and you will receive the Html Button code for your Customized Button.
Step D:
When you have clicked on the Next link, you receive the HTML Button code which you need copy and paste into your Website.

4.3.3 Preset Messages
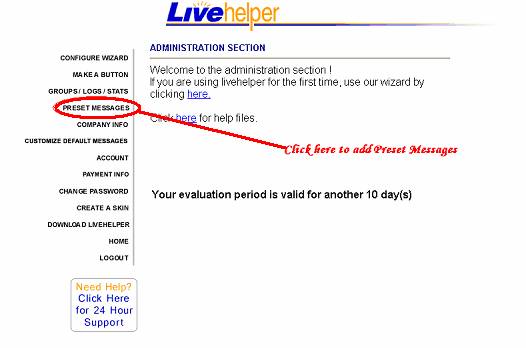
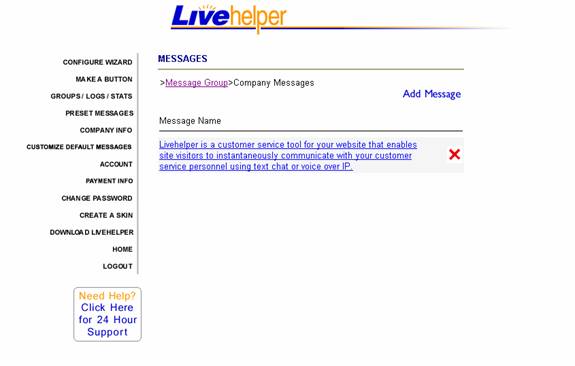
In order to add preset messages, Click on the Link Preset Messages. The messages that you create here in the Admin Area are the Global preset messages that will be available to all the Operators in your Company.
4.3.3.1 Creating Preset Message Group
This takes you to the List of Preset message Groups, which are displayed under Group Name. The Default Message Group displayed is Welcome. If you would like to add more message Groups, then you would have to click on Add Group.
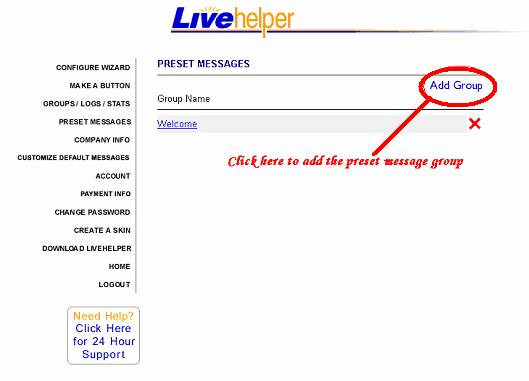
Once you have clicked on Add Group, you see a dialog box where you have to fill in the Group name of the Message Group and click on Submit.

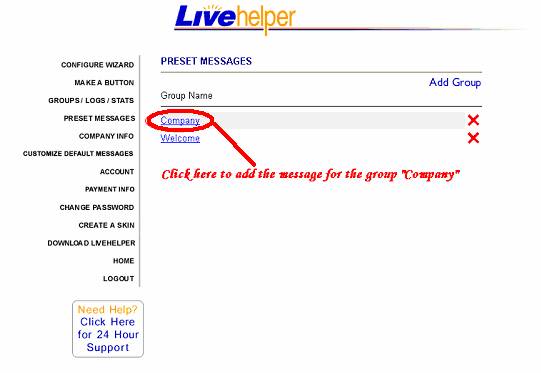
Once you have clicked on Submit you can view all the Message groups that you have created under your Company. To add any message under the Group name, you have to click on the group name. For ex. To add a preset message under Company, you have to click on the group name ‘Company’.
4.3.3.2 Adding Preset Message to a Message Group
Once you have clicked on the Group name, in order to add the message click on Add Message link.
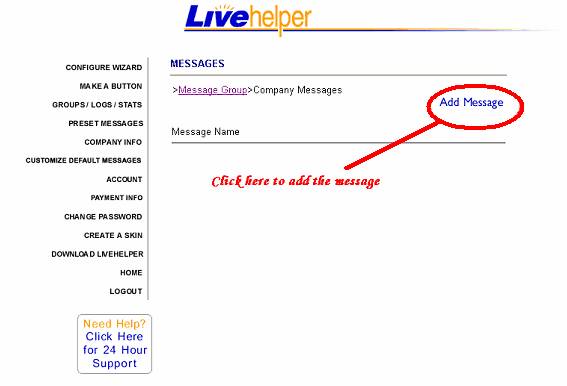
Once you have added the message, you can view the message that you have created. To delete the particular message please click on the X mark next to the message.
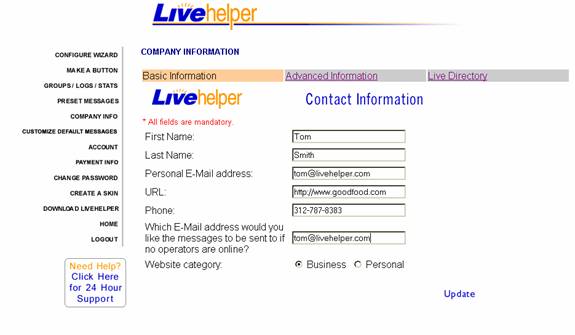
4.3.4 Company Info
You can view your Company Information by clicking on the Company Info link. Here you can make changes in the information provided by you during signup like the URL, the email address etc. After making the necessary changes, click on Update.
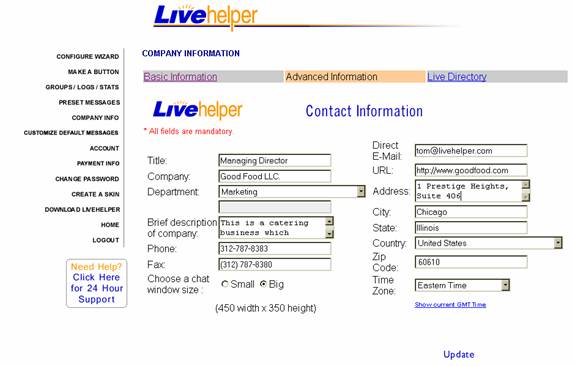
4.3.4.1 Advanced Information
In Advanced Information, you can view/edit the other details of your company like the name of your company, your Title, Address etc. After you have made the changes, you need to click on Update link to save the changes.
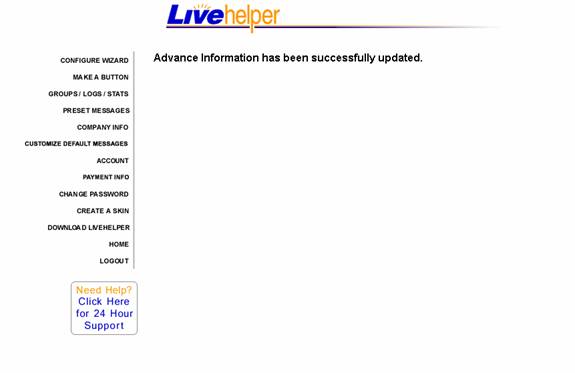
Once you have clicked on Update, you will get the confirmation message that your information has been successfully updated.
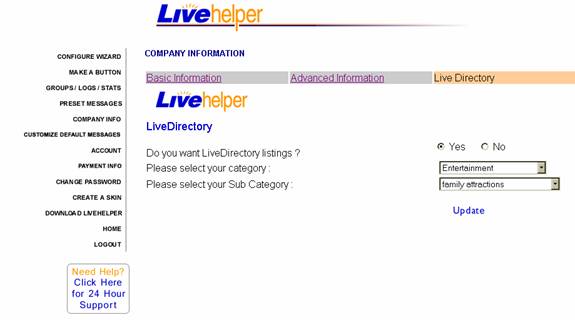
4.3.4.2 Live Directory
You can choose to have Live Directory listings on your site. You have to first select your Category from the drop down box and then select your Sub category. After you have made your Selections, click on the Update link.
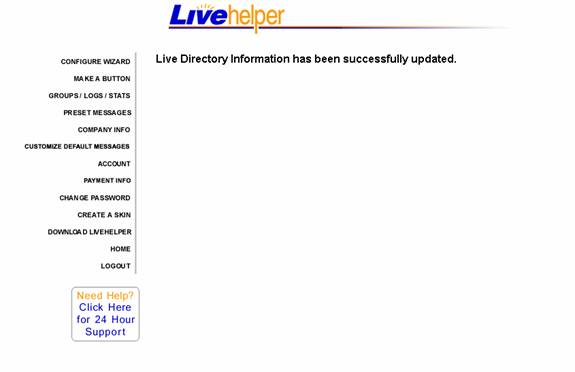
Once you have clicked on the Update link, you can see the confirmation message that your Live Directory Information has been successfully updated.
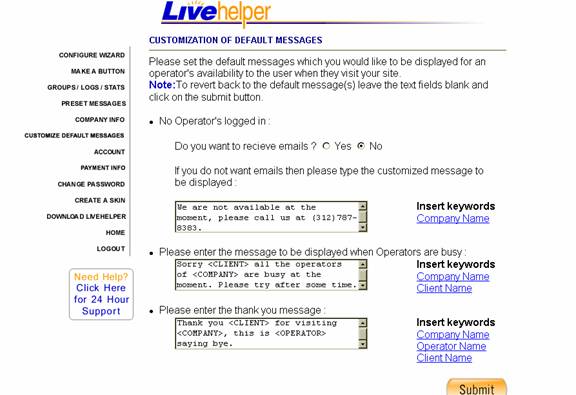
4.3.5 Customized Default Messages
If you would like to customize your messages, click on Customize Default Messages link. Here you can create your own default message, as you would like it to appear on your chat window. You have the option of customizing 3 Default messages.
The First Default Message you can customize is the option to receive Emails when no operators are logged in under your Company ID to take calls from your customers. If you choose ‘Yes’, then you chat window will display a form where your customers can leave you an Offline message at the Email address specified by you during Sign up. If you choose ‘No’, then you are allowed to create your own message, informing your customers that your operators are currently unavailable and give them a particular time that they can be reached soon at, if you so wish.
The Second Default Message that you can customize is the message to be displayed when your Operators are busy.
The Third Default Message that you have the option of customizing is the message to thank the Client after the chat has ended.
You can also insert the Keywords – Company Name, Operator Name and the Client Name in your customized messages.
After you have customized your messages or made the changes in your messages, you need to click on Submit to make the changes permanent.
4.3.6 Account Information
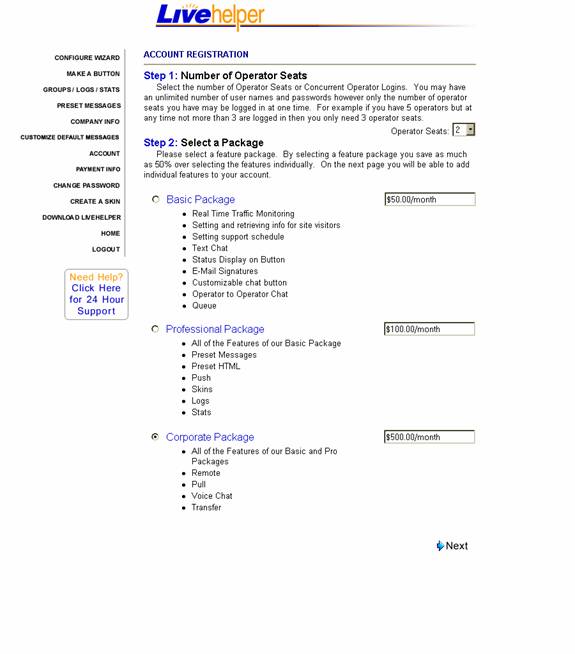
Click on Account link, to register your Company ID within the Expiry of your Free Trial period. The first step is to select the number of Operator seats you would like to opt for. The Step-2, relates to which package you choose, whether it is Basic Package, Professional Package or the Corporate Package. The Prices next to the package will change according to the number of Operators you opt for. After selecting your options, you have to click on the Next link.
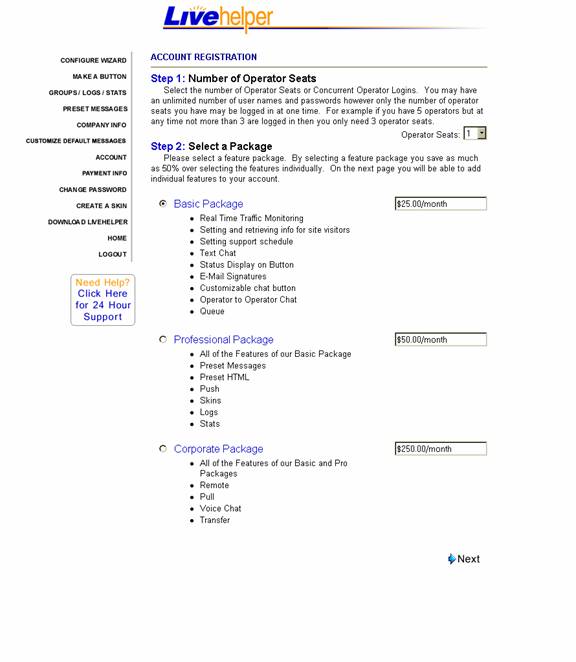
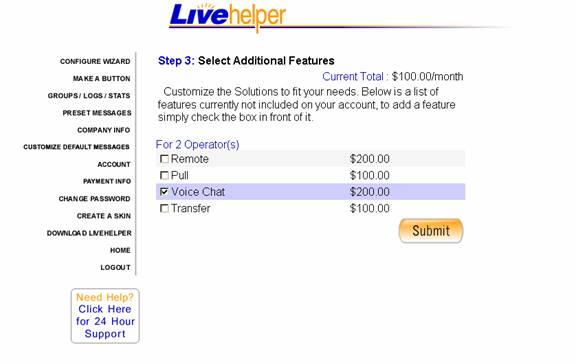
After you have clicked on “Next”, you enter Step 3, wherein you can also select features which are not included in the package already selected by you. You can pick the individual features from the other packages according to the needs of your business and website. Check on the options that you would like to have and then click on the Submit Button.

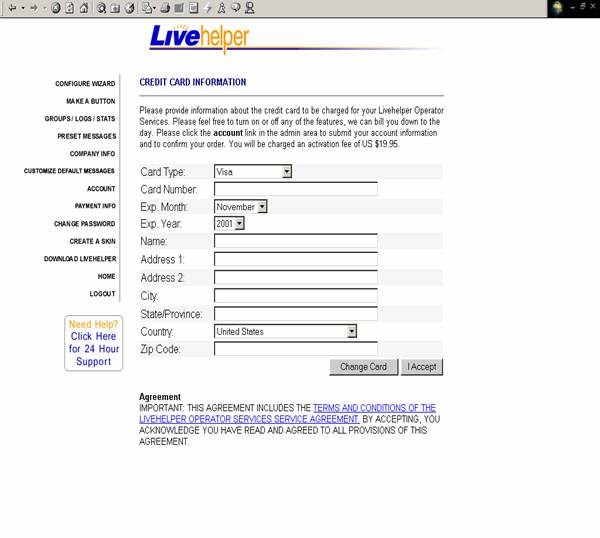
4.3.6.1 Credit Card Information
Once you have opted for the number of Operators you need and selected the Package you would like to go in for you will be directed to the Credit Card Information, where you have to provide the relevant Credit card details. The Credit card form is a secure form where you enter your credit card details. The SSL encryption ensures that your confidential credit card information is completely secure.
You can also click on the Payment Info link in the Admin Area, which will take you to the Credit Card details page.
After you have filled out the Form and gone through the Service Agreement you need to click on the ‘I Accept’ Button.
4.3.6.2 Order Confirmation
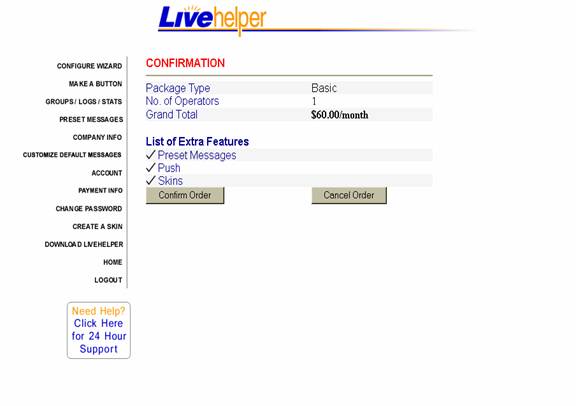
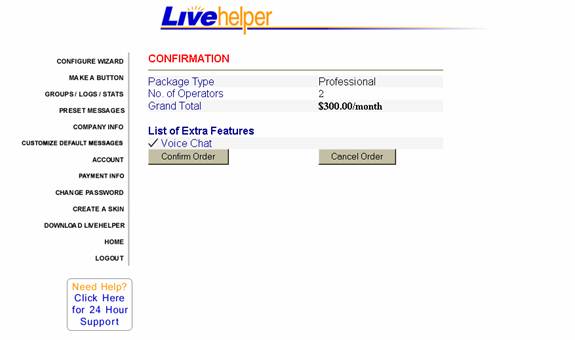
A. This is the Confirmation of your order, where you can view the details of your account. You can view the number of operators you have chosen, the Package selected, the Grand Total of the fee you will be charged per month. You can also view the list of extra Features from the other packages selected by you. Finally, at this point, you have to confirm your order.
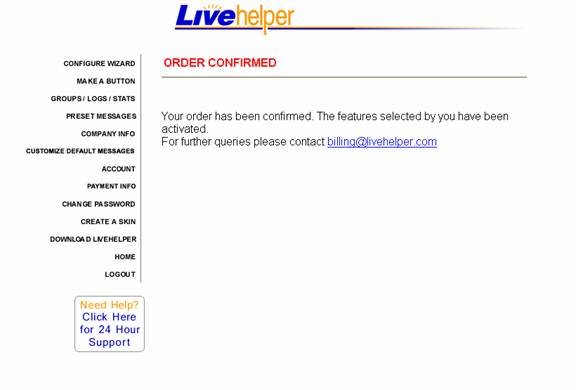
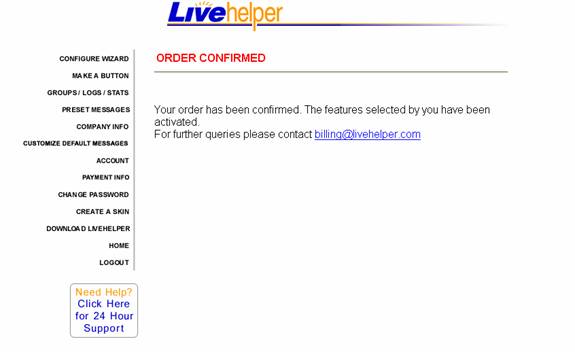
After you have confirmed your order, you get a message that your order is confirmed and that the features selected by you have been activated.
B. You can also opt for the Professional Package and set the number of Operator seats you require.
Once you click on Next, you can select additional Features that you require from the CORPORATE package.
Once you clicked on the Submit button, you can view the details of your order.
On confirming your order you get a confirmation message from Livehelper saying that your order has been confirmed.
C. You can opt for the Corporate package, which includes the features of the Basic and the Professional package, in addition to which you have the options of Remote, Pull, Transfer and Voice chat.
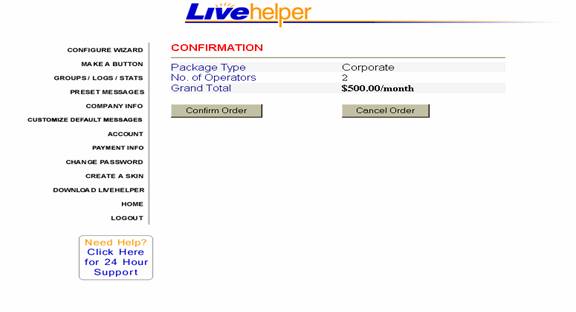
Upon clicking on the Next link, you can view the details of your order, that is the Package you have chosen, the number of operators and also the Grand total which you will be charged monthly.
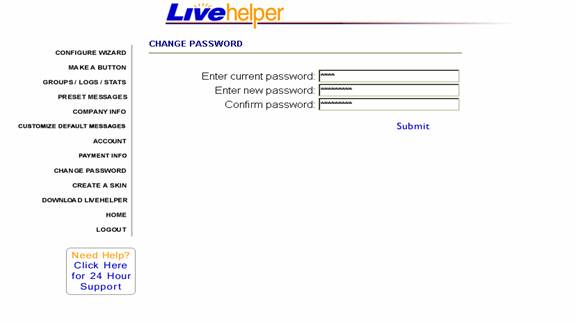
4.3.7 Change Password
You can change your Admin Password by clicking on the Change Password link. Here you have to first type out your current password and then the new password. Then click on the Submit link.
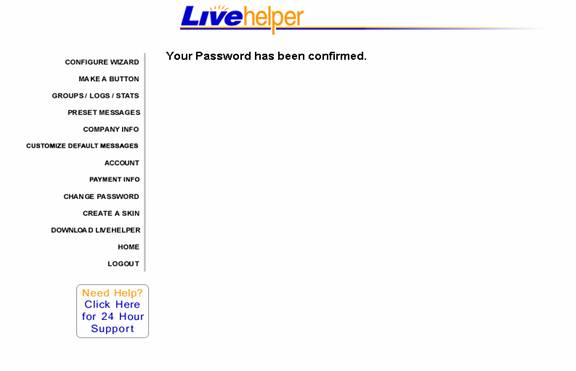
Once you have clicked on Submit, you receive a confirmation message that your password has been changed.
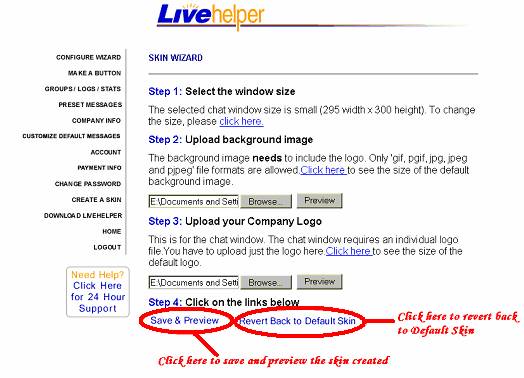
4.3.8 Skin Wizard
Livehelper allows you to customize your chat window skin to suit the look and feel of your website. You can create a skin by clicking on the Create a Skin link. Here according to the window size you have chosen, you can upload the Background image and the Company Logo. You also have the Preview option where you can preview the images of your skins.
5 Operator Console Setup
Install the Operator Console on your machine follow the Stepwise instruction from the Installation wizard. After you successfully install the Operator Console click on the Start Menu ->Program Files ->Livehelper Operator Console.
Now you should see a Dialog box such as the one below pop up.
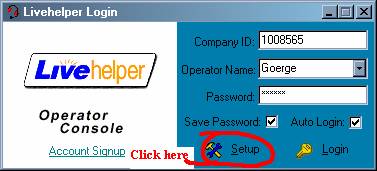
Clicking on the Setup Button would pop out the Operator Console Settings Dialog.
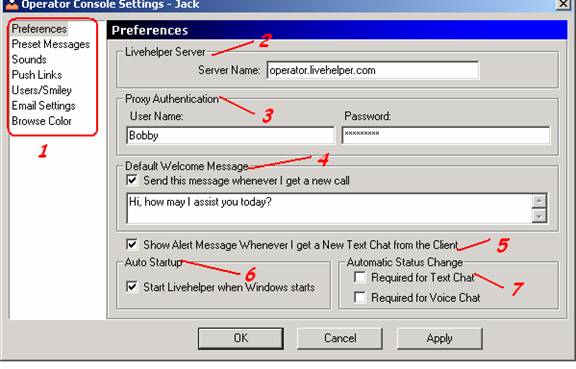
|
Title |
||
|
1 |
Options Navigator |
This is where you click to Navigate for various option Dialogs. |
|
2 |
Server Name |
This is common for all Companies and Operators and it should be Operator.Livehelper.com |
|
3 |
Proxy Authentication |
Here you have to fill the User Name and Password of your** behind a Proxy if you are behind a proxy. |
|
4 |
Default Welcome Message |
Here you type in a Message that you like your clients to receive by default as soon as they initiate a chat |
|
5 |
Alerts on Message arrival |
Check this option if you like to receive alerts on new message arrivals from your clients. |
|
6 |
Auto Start Up |
Check this option if you want Operator Console to start up as soon as windows starts. |
|
7 |
Automatic Status Change |
Check this option if you want to change your status to busy after accepting a chat, not checking this leaves you with the option of changing your status manually. |
Default Welcome Message: The operator can set default welcome message from the Operator console also. This message gets automatically sent to the client as soon as the operator receives a chat.
Show Alert Message: This option gives the Operator an alert message every time a new chat comes in from any client.
Start Livehelper when windows Starts: This option will allow you to start Livehelper operator console automatically when you start Windows on your system.
Automatic Status Change: This option lets your status change to Busy whenever you get a call else the status of the operator remains as available. The operator can also manually change the status to Busy or Available.
The operator in the Operator console can create preset messages locally. Click on the link Preset Messages to view all the messages created locally by you.
Choosing the Preset Messages option would bring out a dialog such as the one below.
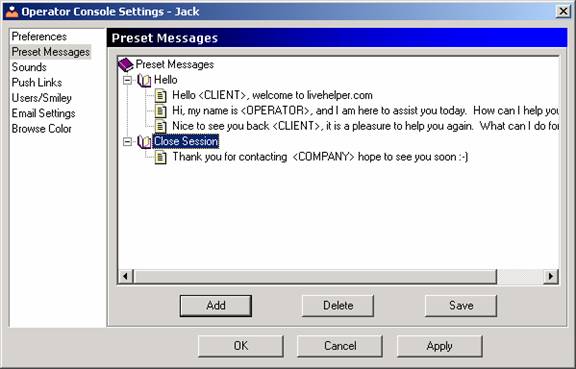
5.2.1 Click on Add button to add preset messages
Be sure to check out the Message Box Header as to what you are adding. If your current selection is at the root of the Tree then you will be adding a Message Group.
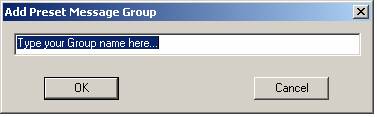
If you want a Message under a Message Group then you should be typing it in a Message Box with the title “Add Preset Messages” such as the one shown below. To bring out a Message box as shown below, make your current selection as that of a Group Name and then click on “Add” button.
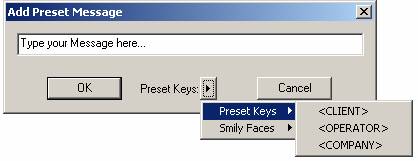
You have the option of adding from the Preset keys and add the Client name, Operator name and Company name in your preset message.
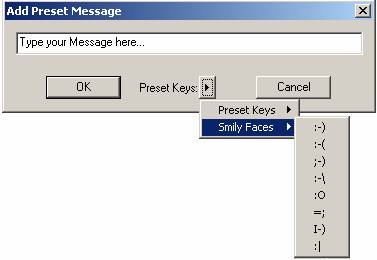
You also have a range of Smileys to choose from to add in your Preset messages.
Then click on “Save” button to save the Message structure. To delete a Message select a message and click on “Delete” Button.
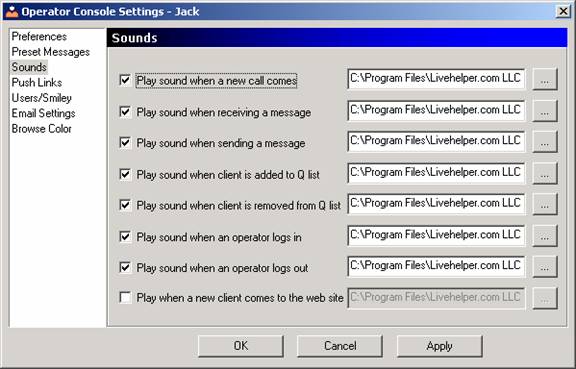
The Sounds Link pops out a dialog where you specify the path of the .wav files you like to play on the various events as mentioned in the dialog. Click on the “Ellipses” button to select a local file. Deselecting an Event would disable that event playing the sound file but the path would be stored, in case you enable it again.
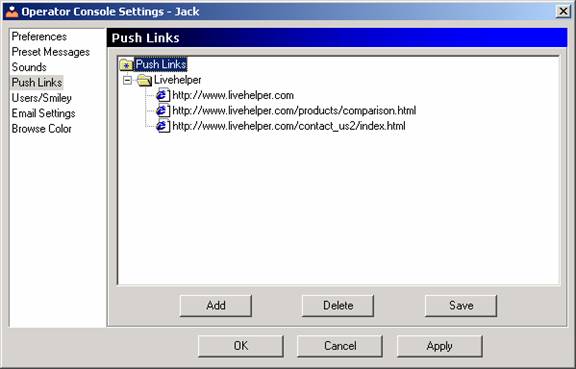
Push Links helps in storing some frequently used URLs of your web site to push it to the client when appropriate for the client to view. The usage is similar to that of Preset messages and Preset HTML.
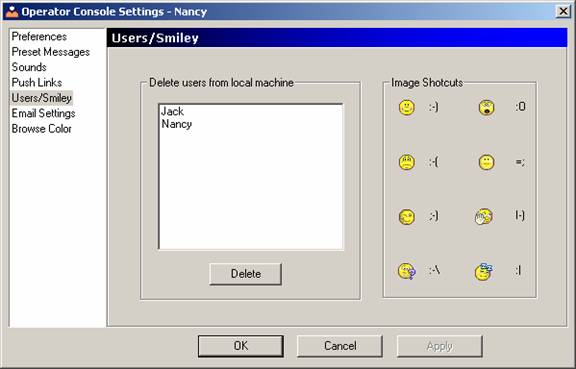
The Users Link shows the users (Operators) logging on the system. Select to delete any operator. And there is the option of checking out smiley short cuts for reference.
When you delete a user from the list all his preset messages/html /push links local to the deleted operator will be deleted.
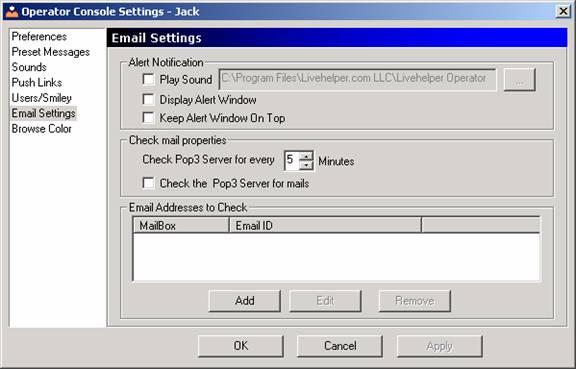
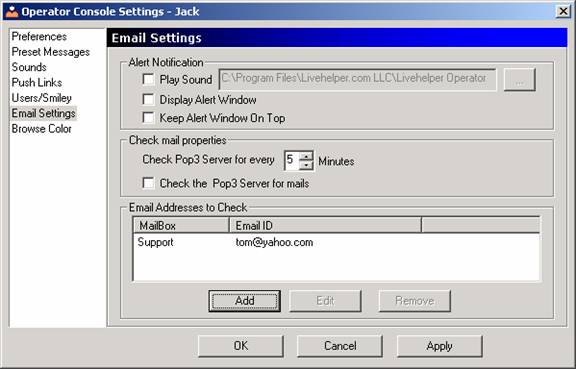
The Email settings dialog has three groups
1) Alert Notification
2) Check mail properties
3) Email addresses to check
5.6.1 Alert Notification
Play Sound: Plays a .wav file, which you would like to play on the event of receiving new mails. You could specify the path of the .wav file in the Text box provided.
Display Alert Window: Checking this option would display an alert window whenever new mail is found in you r Inbox.
Keep Alert window on Top: checking this option keeps the alert window on top of all other open windows at any point of time.
5.6.2 Check mail properties
Check POP3 server: Here you specify the time interval in minutes that your Operator console will check your mailbox for new mails.
Check POP3 server for mails: Checking this option means that, you want your Operator console to poll your POP3 mail server for mails. Not checking this option, the Operator doesn’t poll for new mails in your POP3 server.
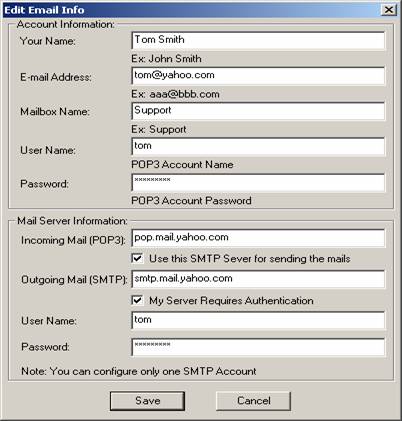
5.6.3 Email Address to Check
Add your Email Addresses in this List; your Operator console will be polling for new mails in all the Email ID’s you mention in this list. When you click on the Add Button, the Form appears as given below. You will need to fill in the details of your Email Accounts, which you need to configure.
Once you have filled up the Email settings and clicked on the Save Button, you can view that the Email address has been added into the Operator console.
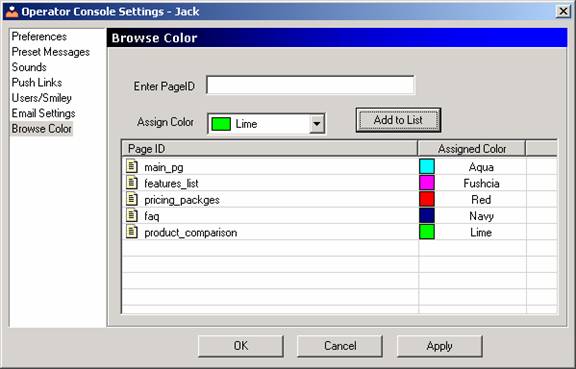
This option allows you to set the Browse color to the different Page Ids on your Website. This option is applicable only locally to a computer and to the Operator who has created it. This enables easier identification of the entries in the Browse list, as the operator can immediately identify which of the visitors are on particular sites and can keep track of them better as they navigate through the website.
6.1 Tab Controls
This Tab will have the following windows
· Operators
· Q List
· Browse List
6.1.1 Operators
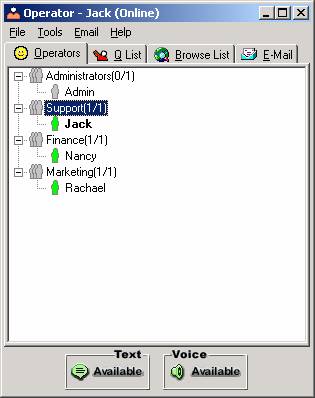
The Operator Tab is the default tab or the first tab in the Operator Console. This tab shows all the Operators in your company under various groups. As soon as you Login only Online Operators will be listed in this tab. If you would like to have all the Operators listed in this tab, then go to the Tools Menu and => Uncheck “Show only Online Operators”.
Here, you can view all the operators who have logged in using your Company ID, and the different groups they belong to. Within the brackets, you can view the number of operators who have logged in from the particular group and the total number of operators in that Group.
6.1.1.1 Tool Menu
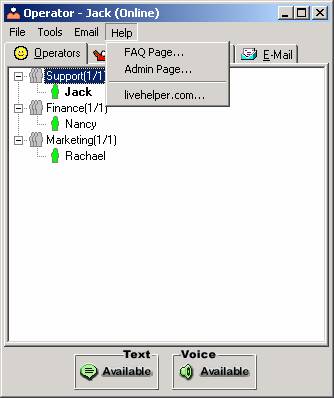
When you right click on an Online Operators, this Tool Menu will appear.

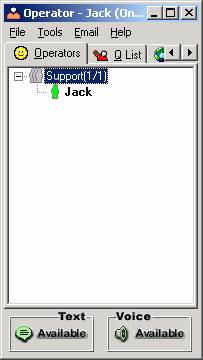
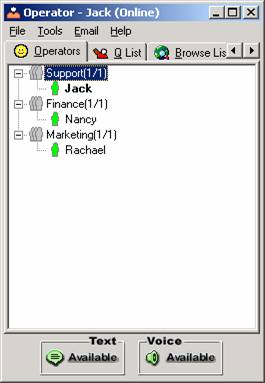
In the Image above there are three Operators logged in, this is a screen shot taken from the machine where Jack is logged into the Operator Console, this is understood by checking out the Title of the window given as “Operator –Jack (Online)”.
Now in the screen shot above Operator Jack has right clicked on Operator Nancy who is the other operator, besides Rachael, who is Online at that point of time for this particular company.
The Menu lists various options such as “Text Chat”, “Voice Chat” etc.
Now clicking on “Text Chat” will initiated a Text Chat with Operator Nancy from Jack. This case holds good for Voice chat too. This is nothing but the Operator-to-Operator Text / Voice Chat.
The are other options are
· “Q” lists
· Browse lists
· Sign off
Clicking on “Q” list or Browse list options would open the “Q” list or the Browse list in separate window.
Please refer to the “Q” list, Browse List topics for further details about the columns and the operations they perform.
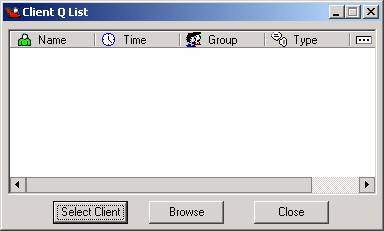
6.1.2 Q List

The ‘Q’ List is a window wherein you could view all the Customers waiting to be attended. The Operator is allowed to Select Customers for a chat. Just right click on the Customers name and click on “Select Client” from the pop up menu. Also provided in the Q List is information about the time the Customer is pending in the ‘Q’ list, Group the client wants to chat with, the Time for which he/she has been in the Q List for and Type of Chat intended by the customer.
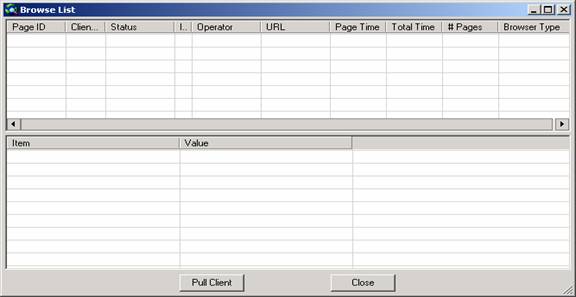
6.1.3 Browse List
The Browse List displays the following details:
· Page Id: The ID of the Page that the Client is currently browsing.
· Client IP: The Machine IP of the client who is on site.
· Status: This displays the Status of the Client as whether he is currently Chatting, Browsing, Waiting or Chat cancelled.
· Information: Here you can view the icon, which shows whether there is any information stored of that client by any of the operators.
· Operator name: This column displays the name of the Operator with whom the Client is in chat with. Else, it displays none.
· URL: This displays the URL of the page the client is currently in.
· Page Time: This displays the time that the client has spent in each page.
· Total time: It is the Time for which the Client has been on the site.
· Number of pages: This shows the total number of web pages the client has visited on your website.
· Browser type: This gives you the Browser version used by your client.
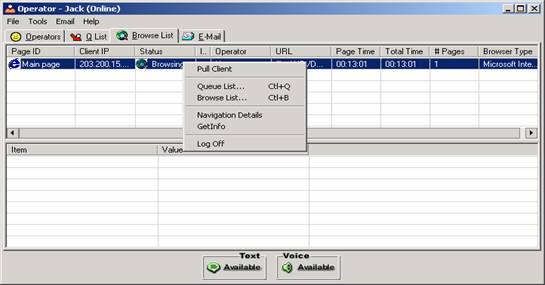
When you right click on a particular entry in the Browse list, you can view the following options- to Pull the Client, you can view the Browse List, the Q list, view the Navigation Details of the Client, Get Info about the Client and the option to Log off.
The following details can be viewed in the Navigation Details:
· Page Id: The Page Ids that client has visited.
· Document: The Document or the URL he is in at the moment.
· Referrer: It is the link from where your client has come into the site.
· Title: The title of the page, the client has opened.
· Time: The time that he has been there in each page.
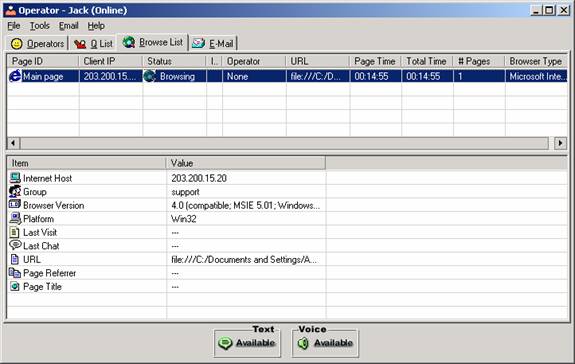
Once a particular entry in the Browse list has been highlighted the following details are shown.
· The Internet Host: This shows the Internet Host Company that the client is using.
· Group: Depends on the Tracker code as to which group you have mentioned on that Page.
· Browser version: This gives the version of the Browser that the client is using.
· Platform: This displays which platform or operating system the client is using.
· Last visit: This displays the last visit of the Client to your Website.
· Last chat: This shows the last chat had with any operators of your site.
· URL: The URL of the page that the client is in is displayed here.
· Page Referrer: This refers to the link from where the client came in for a chat.
· Page Title: This displays the title of the page where the client is in.
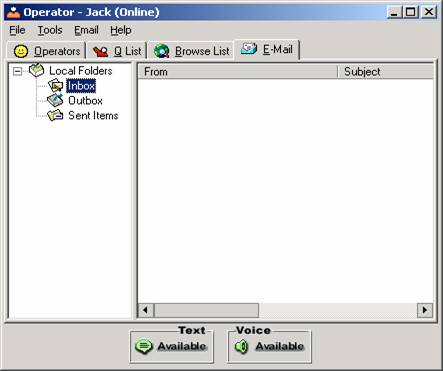
6.1.4 Email Option
This feature allows the operator to manage their Emails right from their Operator console itself. Here, the operator can view all the Emails in his Inbox. He can also send Emails from the Operator console and view the Sent Items and the Outbox. (For more Details Refer E-Mail Tab Topic 6.3.3)
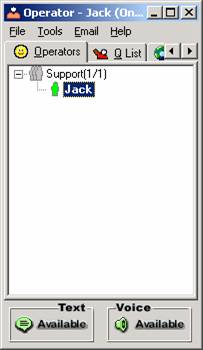
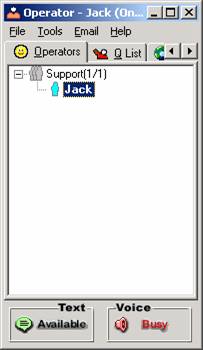
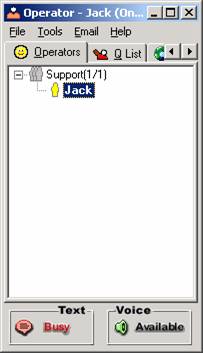
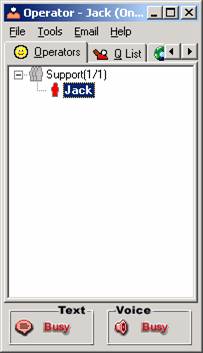
The images above show the various color schemes provided in order to identify the various modes that the operators are available on. That is, if the operator is:
- Available in both Text and Voice - Green
- Available in Text and busy in Voice - Blue
- Available in Voice and busy in Text - Yellow
- Busy in both Text and Voice – Red
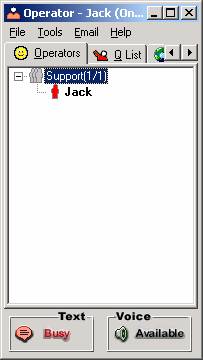
The other option available in case of color schemes is when the feature of “Voice Chat” is disabled and only the “Text Chat” option is available. So if the operator is available then the color is shown as Green and in case the operator is busy it is shown as Red.
6.3.1 File Menu
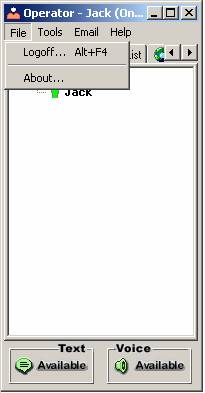
6.3.1.1 Logoff….
This option is used when you want to Logoff from the operator console.
6.3.1.2 About….
By clicking on this menu item, it will display the “Credentials of Livehelper.com”
6.3.2 Tools Menu

6.3.2.1 Q list …
The “Q” list Menu Item is similar to the Context Menu in the Operator Tab. (For more Details Refer “Q” list Tab Topic 6.1.2.)
6.3.2.2 Browse list…
The “Browse list” is also similar to the Context Menu in the Operator Tab. (For more Details Refer Browse List Tab Topic 6.1.3.)
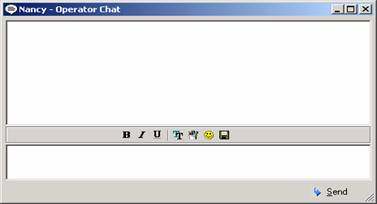
6.3.2.3 Text Chat
This Option is meant for Operator-to-Operator text chat. A screen like the one shown below would pop up.
6.3.2.4 Voice Chat
Operators can also have Voice chats with each other. A screen such as that below will appear. Refer to the Voice chat topic for its functionality and other details.

6.3.2.5 Create Button
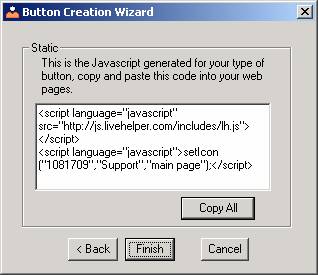
This Option is a wizard to create a Button of Livehelper. It basically gives a JavaScript based on the Type of button you choose. You have to copy and paste it on your web pages.
The wizard displays four types of button that can be created by the wizard.

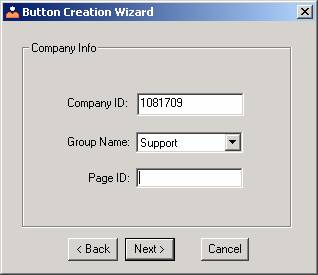
You have to fill in the Company ID, Group Name and Page ID in the Text field as shown below.
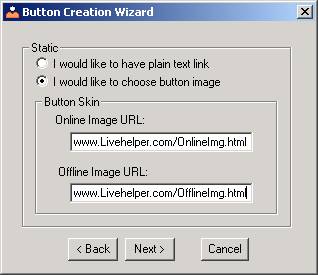
In case of Customized button you have to provide the Image URL for both Online and Offline Button link as shown in the figure below.
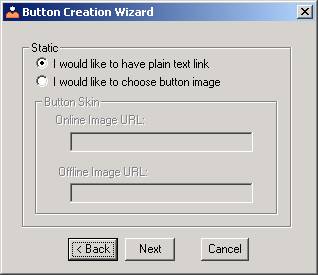
In case you would like to have plain text, you can do so by choosing “I would like to use plain text” option.
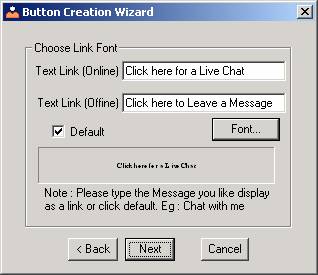
Upon clicking the Next link, you get the screen as shown below, where you will have to fill in the Text links for both the Online and Offline button links in your web page.
Uncheck the Default option to type in your own customized message.
Now you get to the last step where in you get the generated JavaScript select “Copy All” to copy the contents to the clipboard and paste it on the source code of your website.
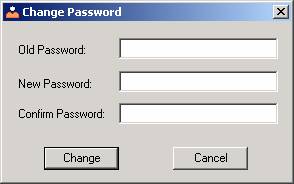
6.3.2.6 Change Password
The Operator has the option of changing his Operator console login password using this option. He has to type in the Old password along with the New Password and click on the Change button.
Rest assured the admin can edit your password if required through the Admin panel on the web.
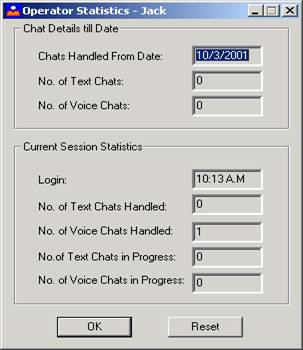
6.3.2.7 Operator Statistics
Shows your Chat statistics, this information is local to a machine and will start a new statistics if you login with the same Username and Password in another machine.
The operator can view his Chat details through this Option. He can view the total number of Text and Voice chats he has handled, as well as the Current login Statistics. Click on Reset to reset all the values to 0.
6.3.2.8 Change Default Message
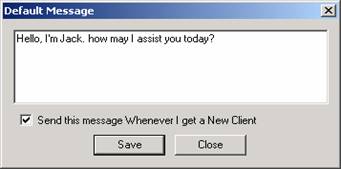
The Operator can set, view or modify his Default message which he greets his customers with, using this option.
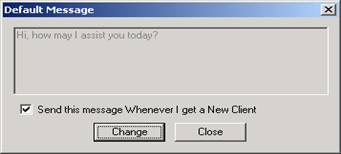
You can edit this message and any further chats would be sent with the new message.
6.3.2.9 Refresh
Refreshes the Operator tab to reflect the new status of the Operators in your company. Selecting this option forces a refresh to the Operator tab. The Operator Tab is refreshed periodically by itself; this option is handy when you want status instantaneously.
6.3.2.10 Always On Top
Keeps the Operator console window on top of all other currently Open windows.
6.3.2.11 Show only Online operators
Shows only Online operators in your company. Uncheck this option to view all Operators in your company in the Operator Tab.
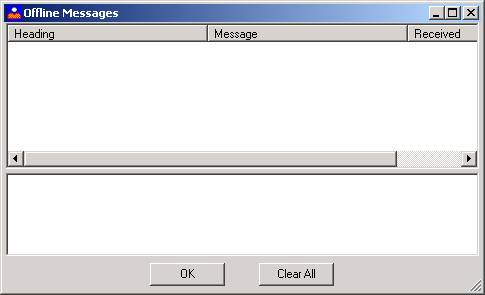
6.3.2.12 Show Offline Messages
Here the operators can view the Offline messages that have been received by the Company.
6.3.2.13 Display Internet Down Message
This option if checked will give you an alert message every time the Internet connection goes down.
6.3.3 Email Menu
The operators have the option of managing their Emails from the Operator Console itself. This is very similar to the Outlook Express application wherein you can manage all your Email accounts from your operator console itself.
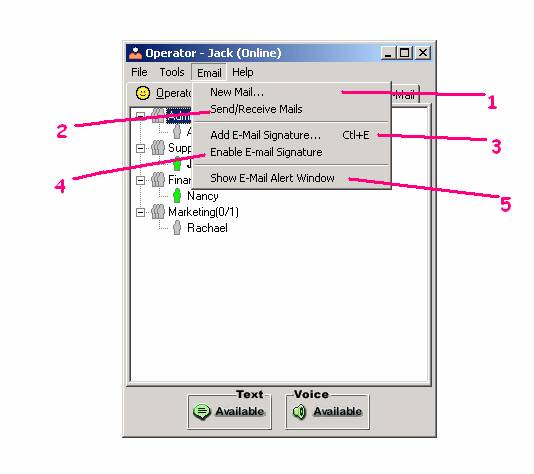
6.3.3.1 New Mail
The operator can send Emails from the operator console itself, using this option.
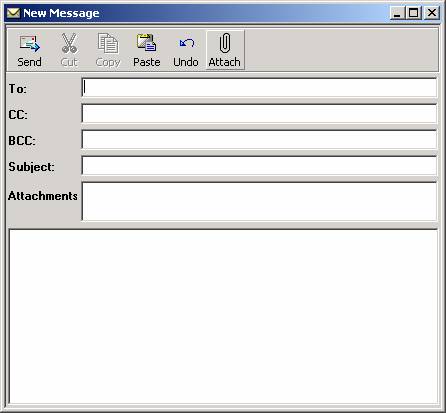
6.3.3.2 Send and Receive mails
Send Email form your POP3 account; you can send mails only from your POP3 account.
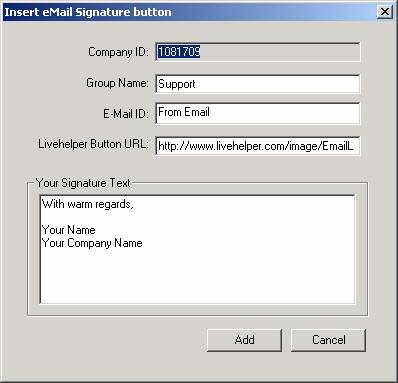
6.3.3.3 Add Email signature…
The operator can also add the Email signature button onto his Emails using this option. He only has to fill in the Group name, the Email Id, Give the Button code URL and customize the Signature text and click on Add button. His Email signature will be added to his Outlook Express or Outlook 2000 which ever he is using.
6.3.3.4 Enable Email signature
The operator has the option of enabling or disabling the Email signature before sending his Emails from the Operator console, by checking on the option in the menu.
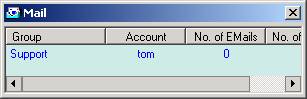
6.3.3.5 Show Email Alert window
The operator can choose to view his Email Alert window by checking on that option. He can view the Group name, the Account name under which he has received the Emails, the number of Emails in his Account and the number of new Emails that he has received.
6.3.4 Help Menu
The Help menu has the links to Livehelper’s FAQ page, the Admin page and Livehelper’s homepage. This allows the Operator to have easy access to Livehelper’s web pages.
6.3.4.1 FAQ
By clicking on this menu item a new browser window opens the FAQ page of Livehelper.
6.3.4.2 Admin Page
This menu item opens the Admin Page of Livehelper in a new browser window.
6.3.4.3 Livehelper.com
This menu item will help you to reach the Livehelper Home Page.
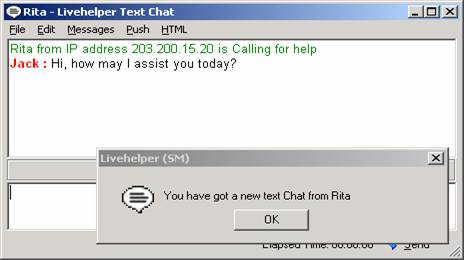
When the client initiates a Text chat, the following window appears before him.

This is the view of the Operator side Chat window. In this case, Jack has opted for the Alert message whenever he gets a new client.
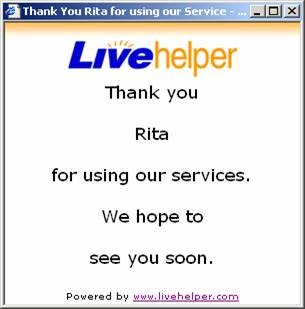
Once the client has closed the chat window or ended the chat, she gets a Thank you message from your company and the operator gets notified that the chat has been disconnected.
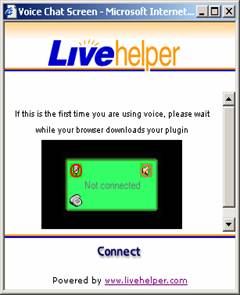
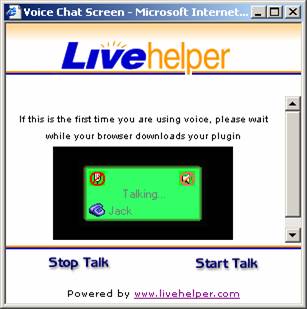
8.1 Step 1 – Starting Voice Chat

The above two bitmaps show the Client side and the Operator side for the Voice.
First the Client clicks on the “Enter voice chat” button, then on the Operator side a Dialog box like the one shown on the right gets popped up if the Operator has made himself available for Voice Chat else the client goes into the Queue list till the Operator makes himself available for voice chat. On the Client side the Voice Chat Plug in gets downloaded if the client is using voice chat for the First time. Then the client gets a screen as shown below. Now the client would not be connected to the Operator unless he clicks on the “Connect” link. And if he presses on the “Connect” link the he gets listed on the Operators Voice Dialog as shown in the figure below.
8.2 Step 2 – Connection for Voice Chat
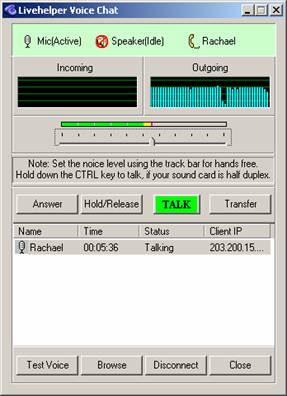
Now at this stage the Operator to continue the Voice Chat from his end should select the client from the list and then click on the “Answer” button and then click on the “Start Talk”
8.3 Step 3 - Communication Interface
At this stage Operator has done his part of the job to accept the voice chat, now the client should click on “Start Talk” link and see that the Microphone and Speaker bitmaps change to active state without the cross bar circle on it. Now the communication from both sides is established and the voice chat could continue. The change on the client side screen is shown in the figure below.
Note:
If the Client or the Operator side of the voice chat is not clear then the Operator could adjust the scroll bar provided in the Dialog box.
Moving the Scroll bar towards left could make the Incoming voice to the Operator clearer and moving the Scroll bar to the Right could make the Out going voice from the Operator clearer.
If the Operator wants to end the voice chat he has to first select the client from the list and click on “Disconnect” and then the voice chat between the Client and the Operator is closed
The Operator cannot close the Dialog if there are any live Voice Connections pending; he has to “Disconnect” all in order to close the Dialog.
The client has no option of reducing the Noise level from his end he has to contact the operator to make his speech clearer.