
Feature List | Product Benefits | Packages / Pricing | Free Trial
Online Guide to Developing and Installing a Livehelper Skin
Livehelper allows its clients to completely customize their users experience. Customization can be done quickly and easily through our online admin. Outlined below is an overview of the steps to creating and installing a skin with Livehelper.
Step 1 - Creating a Custom Skin
A skin is comprised of 2 files. The first is a background that is displayed on the main, e-mail, transfer and hold pages. Below are 2 examples of background images:
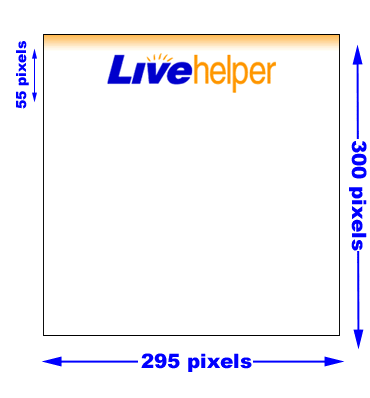 
Note that the image is predominantly blank. This is because text boxes, buttons and other elements will be located here. We have found that designs in this area may confuse users so we recommend using a single light color as your background.
To create your own background image open your image editing program and create a new image with a width of 295 pixels and a height of 300 pixels. Place your logo and any other items you would like on your background in the top 55 pixels for optimal compatibility. Then save the image as either a jpeg (.jpg) or GIF (.gif) image.
The second file is a header image displayed during a chat session. Below are 2 examples of header images:
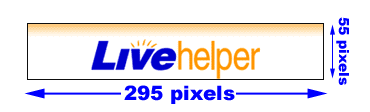 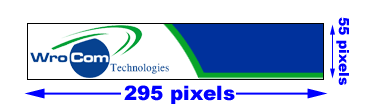
To create your own header image open your image editing program and create a new image with a width of 295 pixels and a height of 55 pixels. Place your logo and other elements on the image once again and then save the image as either a jpeg (.jpg) or GIF (.gif) image.
Step 2 - Install the Skin on Your Account
First, Login to our Online
Admin. Now on the menu on the left portion of the screen select "Create a skin". Click the first Browse button and locate the background image you designed and saved. Next, click the second Browse button and locate the file where you saved your header image. Finally, click "Save and let me see how it looks". You will receive a confirmation page telling you that your images were received. Your skin is now online and all users to your site will see them.
Step 3 - Test your skin
Now that your skin is online, we recommend you try it out and make sure you like how it looks. If you decide to make a change simply modify the image and then upload both images again. Please note that you MUST upload both images every time you make a change, even if there is no change to one of the images.
|
